ImmoManager – User Manual
Step-by-step guide for rental properties, HOA management, holiday apartments, utility billing, HOA statements, AI receipt analysis, and data backup.
Documented for version v2.0.20
1. Getting Started
macOS – Installation
The macOS version of ImmoManager is built exclusively for Apple Silicon (ARM) – i.e. Macs with M1, M2, M3, or M4 chips. A separate Intel version is not available.
Intel Mac? You can still run the ARM app on an Intel Mac using Rosetta 2. Open Terminal and run the following command once:
softwareupdate --install-rosetta --agree-to-license
Then launch ImmoManager as normal by double-clicking. The translation layer works in the background; the app behaves identically. Performance differences are negligible for a desktop management application of this type.
After opening the DMG image, drag the app to your Applications folder. On first launch, macOS may ask whether you want to open the app from an unknown developer – confirm this under System Settings → Privacy & Security → Open Anyway.
Windows – Installation & SmartScreen Notice
Download the setup file and start it by double-clicking. Windows may show a security warning on first run:
"Windows protected your PC" (SmartScreen message)
This warning appears for installer files that haven't reached sufficient distribution yet – Microsoft initially classifies new software as unknown until enough installations have taken place. This is not an indication of malware.
To proceed: click "More info" and then "Run anyway". The installation will then continue normally.
The warning disappears automatically once the app reaches a sufficient installation base.
iOS – Installation (iPad)
ImmoManager is available in the Apple App Store. Search for "ImmoManager" or follow the link from your purchase confirmation. Note: iOS 16 or newer is required.
License and AI note: The iOS version does not require a separate license key – the App Store purchase already includes the full feature set. AI features (receipt analysis, lease analysis, AI assistant) are optional and require your own API key from one of the supported providers.
On first launch, ImmoManager automatically opens the settings page. Enter your name and address – these details appear on billing PDFs.
Android – Installation
ImmoManager is available in the Google Play Store. Search for "ImmoManager Entropy" or follow the download link from your purchase confirmation. Android 8.0 or newer is required.
File transfer note: To load receipts (PDFs, photos) into the app on Android, you can email files to yourself, share them via a cloud app (e.g. Google Drive), or photograph them directly with the camera app. Drag & drop is not available on mobile devices; instead the system file picker opens.
Initial Setup
On first launch, ImmoManager automatically opens the Settings page. Enter at least your name and address – these details appear as the sender on billing PDFs.
If you want to use AI receipt analysis, also select an AI provider here and enter your API key (see Section 3.7).
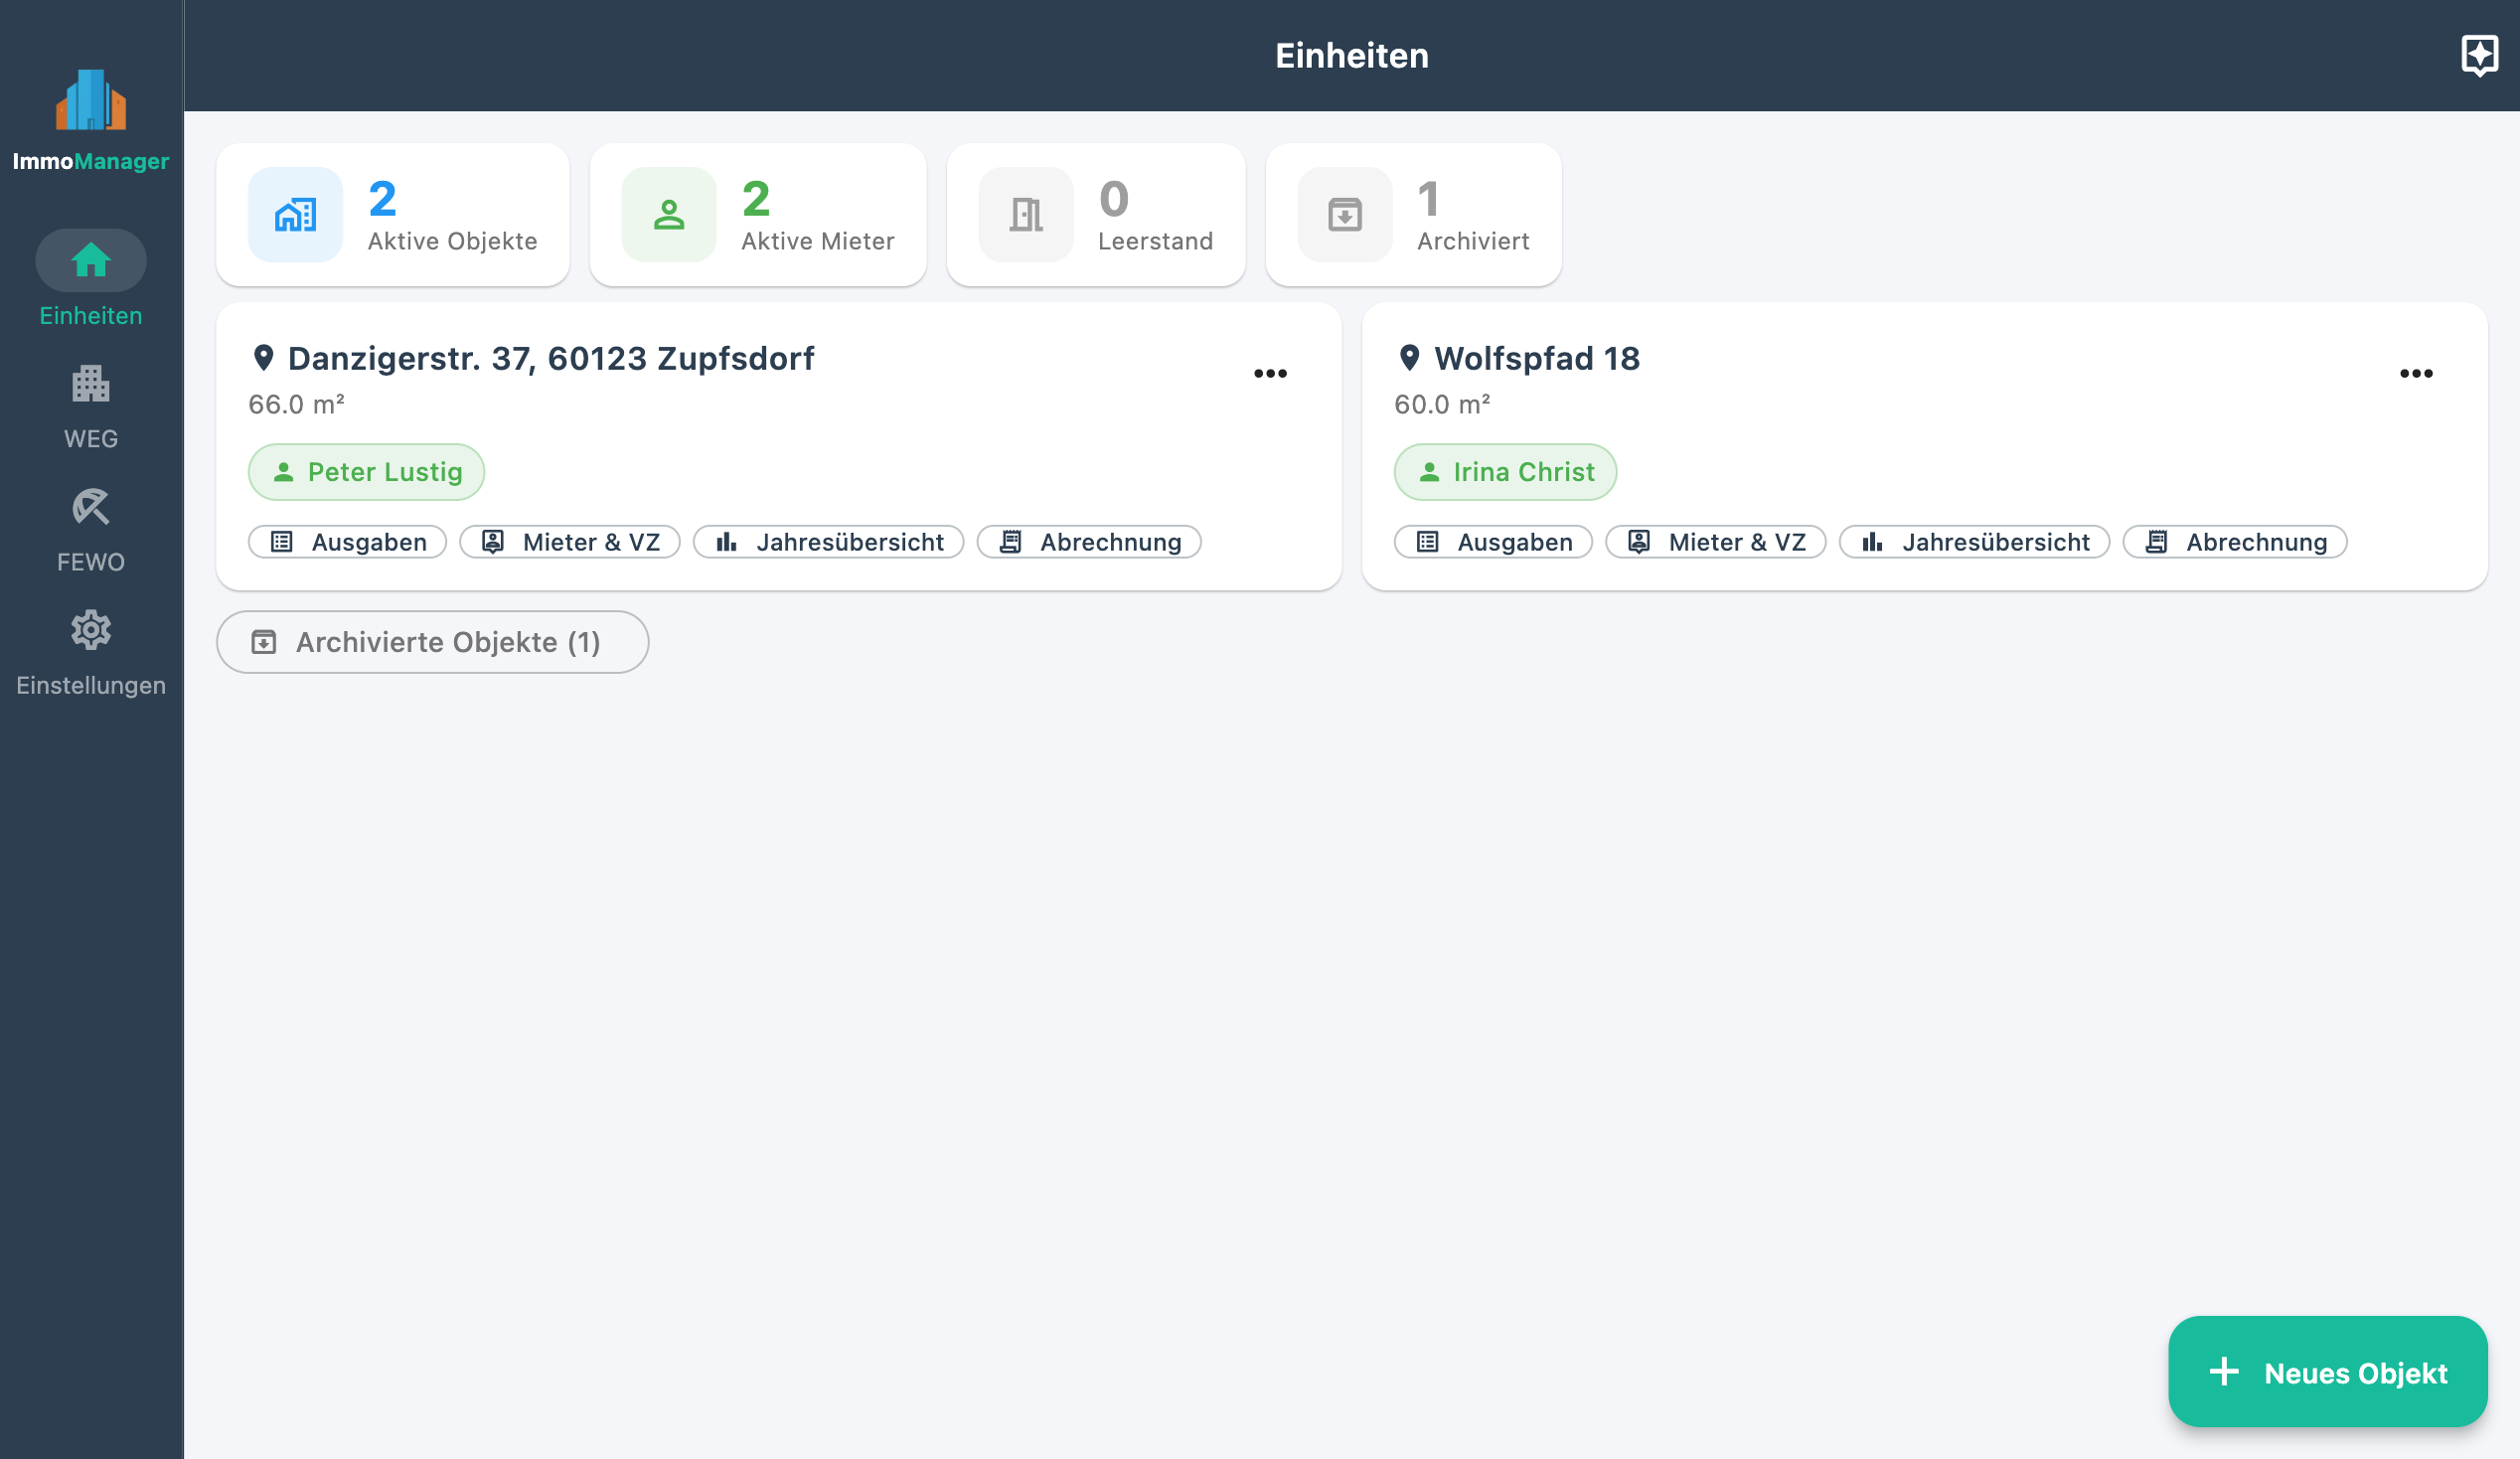
2. Dashboard
The dashboard gives you an at-a-glance view of all properties, HOAs, and holiday apartments.

KPI Summary (top)
- Active Properties – rental units currently occupied or vacant
- Active Tenants – tenants with an ongoing lease
- Vacancies – properties without an active tenant
- Archived – deactivated properties (still accessible for historical review)
Property Cards (Rental Properties)
Each card shows address, living area, and the current tenant (green badge = rented, yellow badge = vacant). Click the action buttons to go directly to:
- Expenses – record and manage costs
- Tenant & Advances – tenant management and advance payments
- Statement – utility bill for the current or a previous year
- Tax – annual tax overview (Schedule E / Rental income)
The three-dot menu (⋮) in the top right of each card offers "Archive" and "Delete permanently".
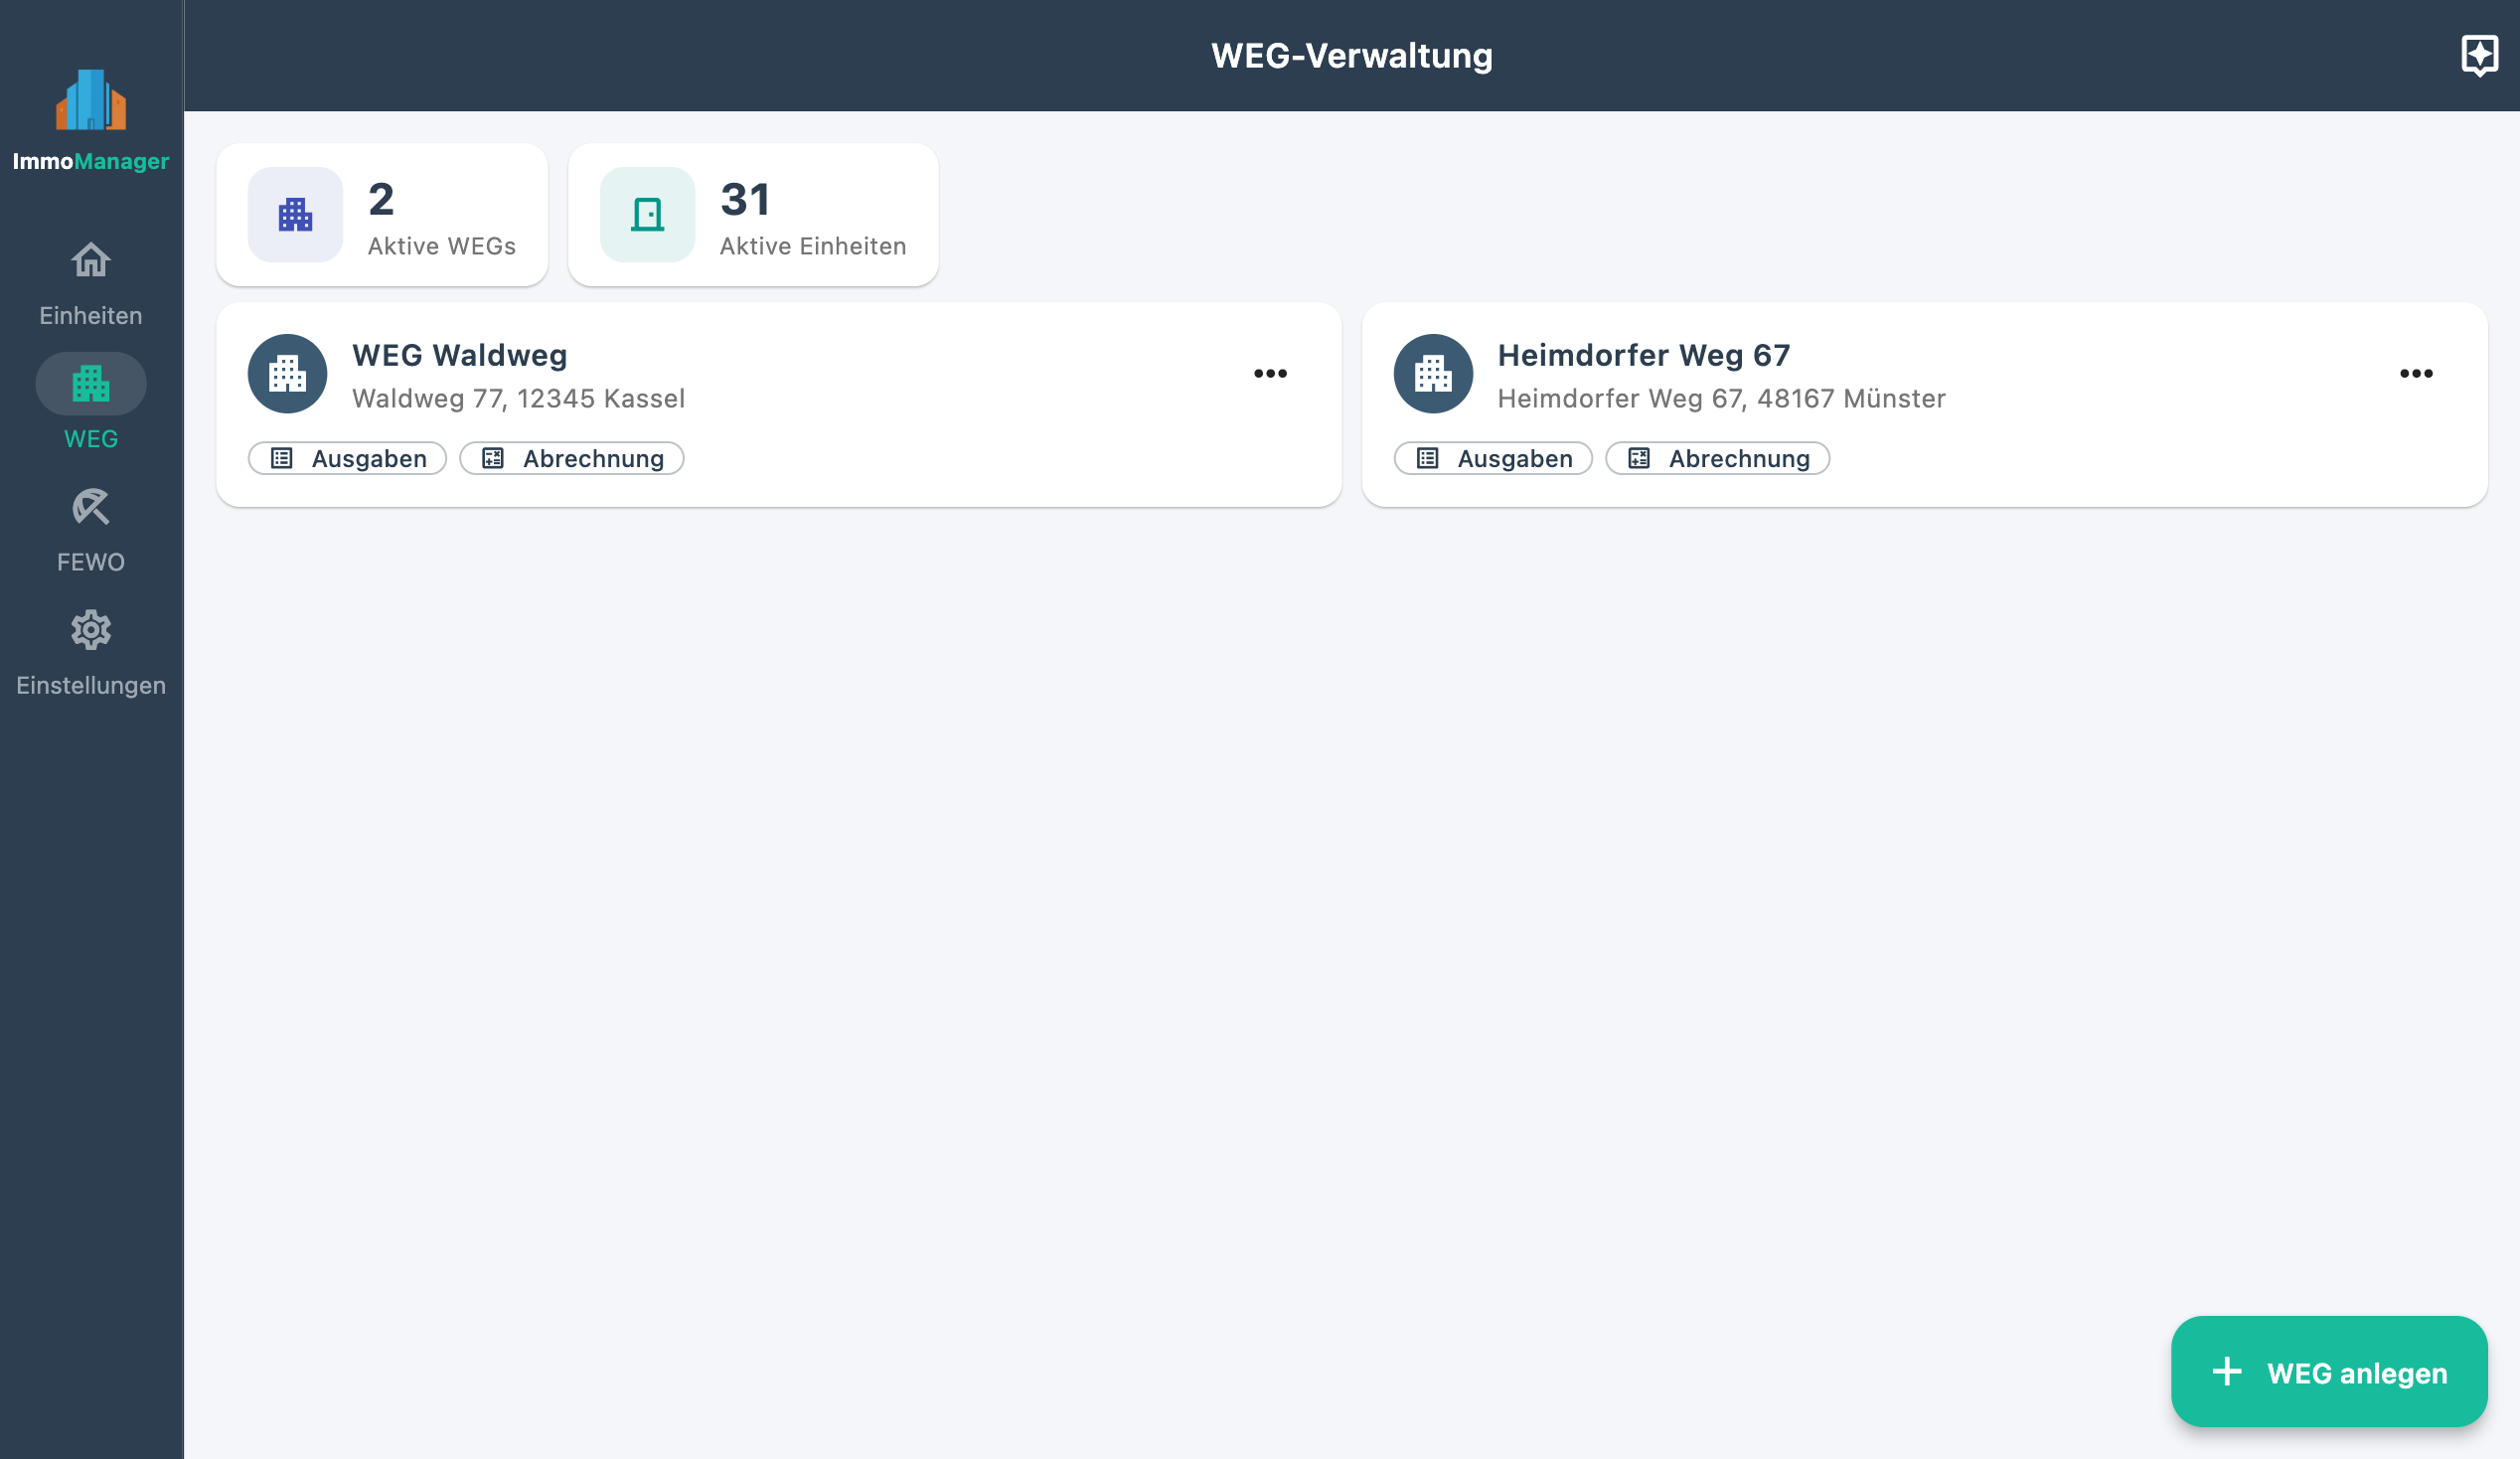
HOA Cards
HOAs are shown as separate cards below rental properties. You can see the name, address, and a summary of units (occupied/vacant). The action buttons take you to the HOA Dashboard and HOA Expenses.
Holiday Apartment Cards
Holiday apartments appear below HOAs in their own section. Clicking a card opens the holiday apartment detail view with the "Expenses" and "Statements" tabs.
Archived Items
At the bottom of the page, archived properties and HOAs are listed in a collapsed section. You can reactivate them (arrow icon) or delete them permanently.
3. Rental Properties
3.1 Create Property
Click "New Property" on the dashboard.

| Field | Required | Note |
|---|---|---|
| Address | ✓ | Used on all documents |
| Living area (m²) | ✓ | Required for proportional billing |
Add first tenant directly (optional):
You can enter a tenant when creating the property. Fill in the "First Tenant" section:
| Field | Note |
|---|---|
| Name | Full name of the tenant |
| Move-in date | For proportional billing in the move-in year |
| Year | Billing year for the advance payments |
| Base rent | Monthly net rent |
| Utility advances (general) | Monthly utility advance payment |
| Utility advances (heating) | Separate heating advance payment |
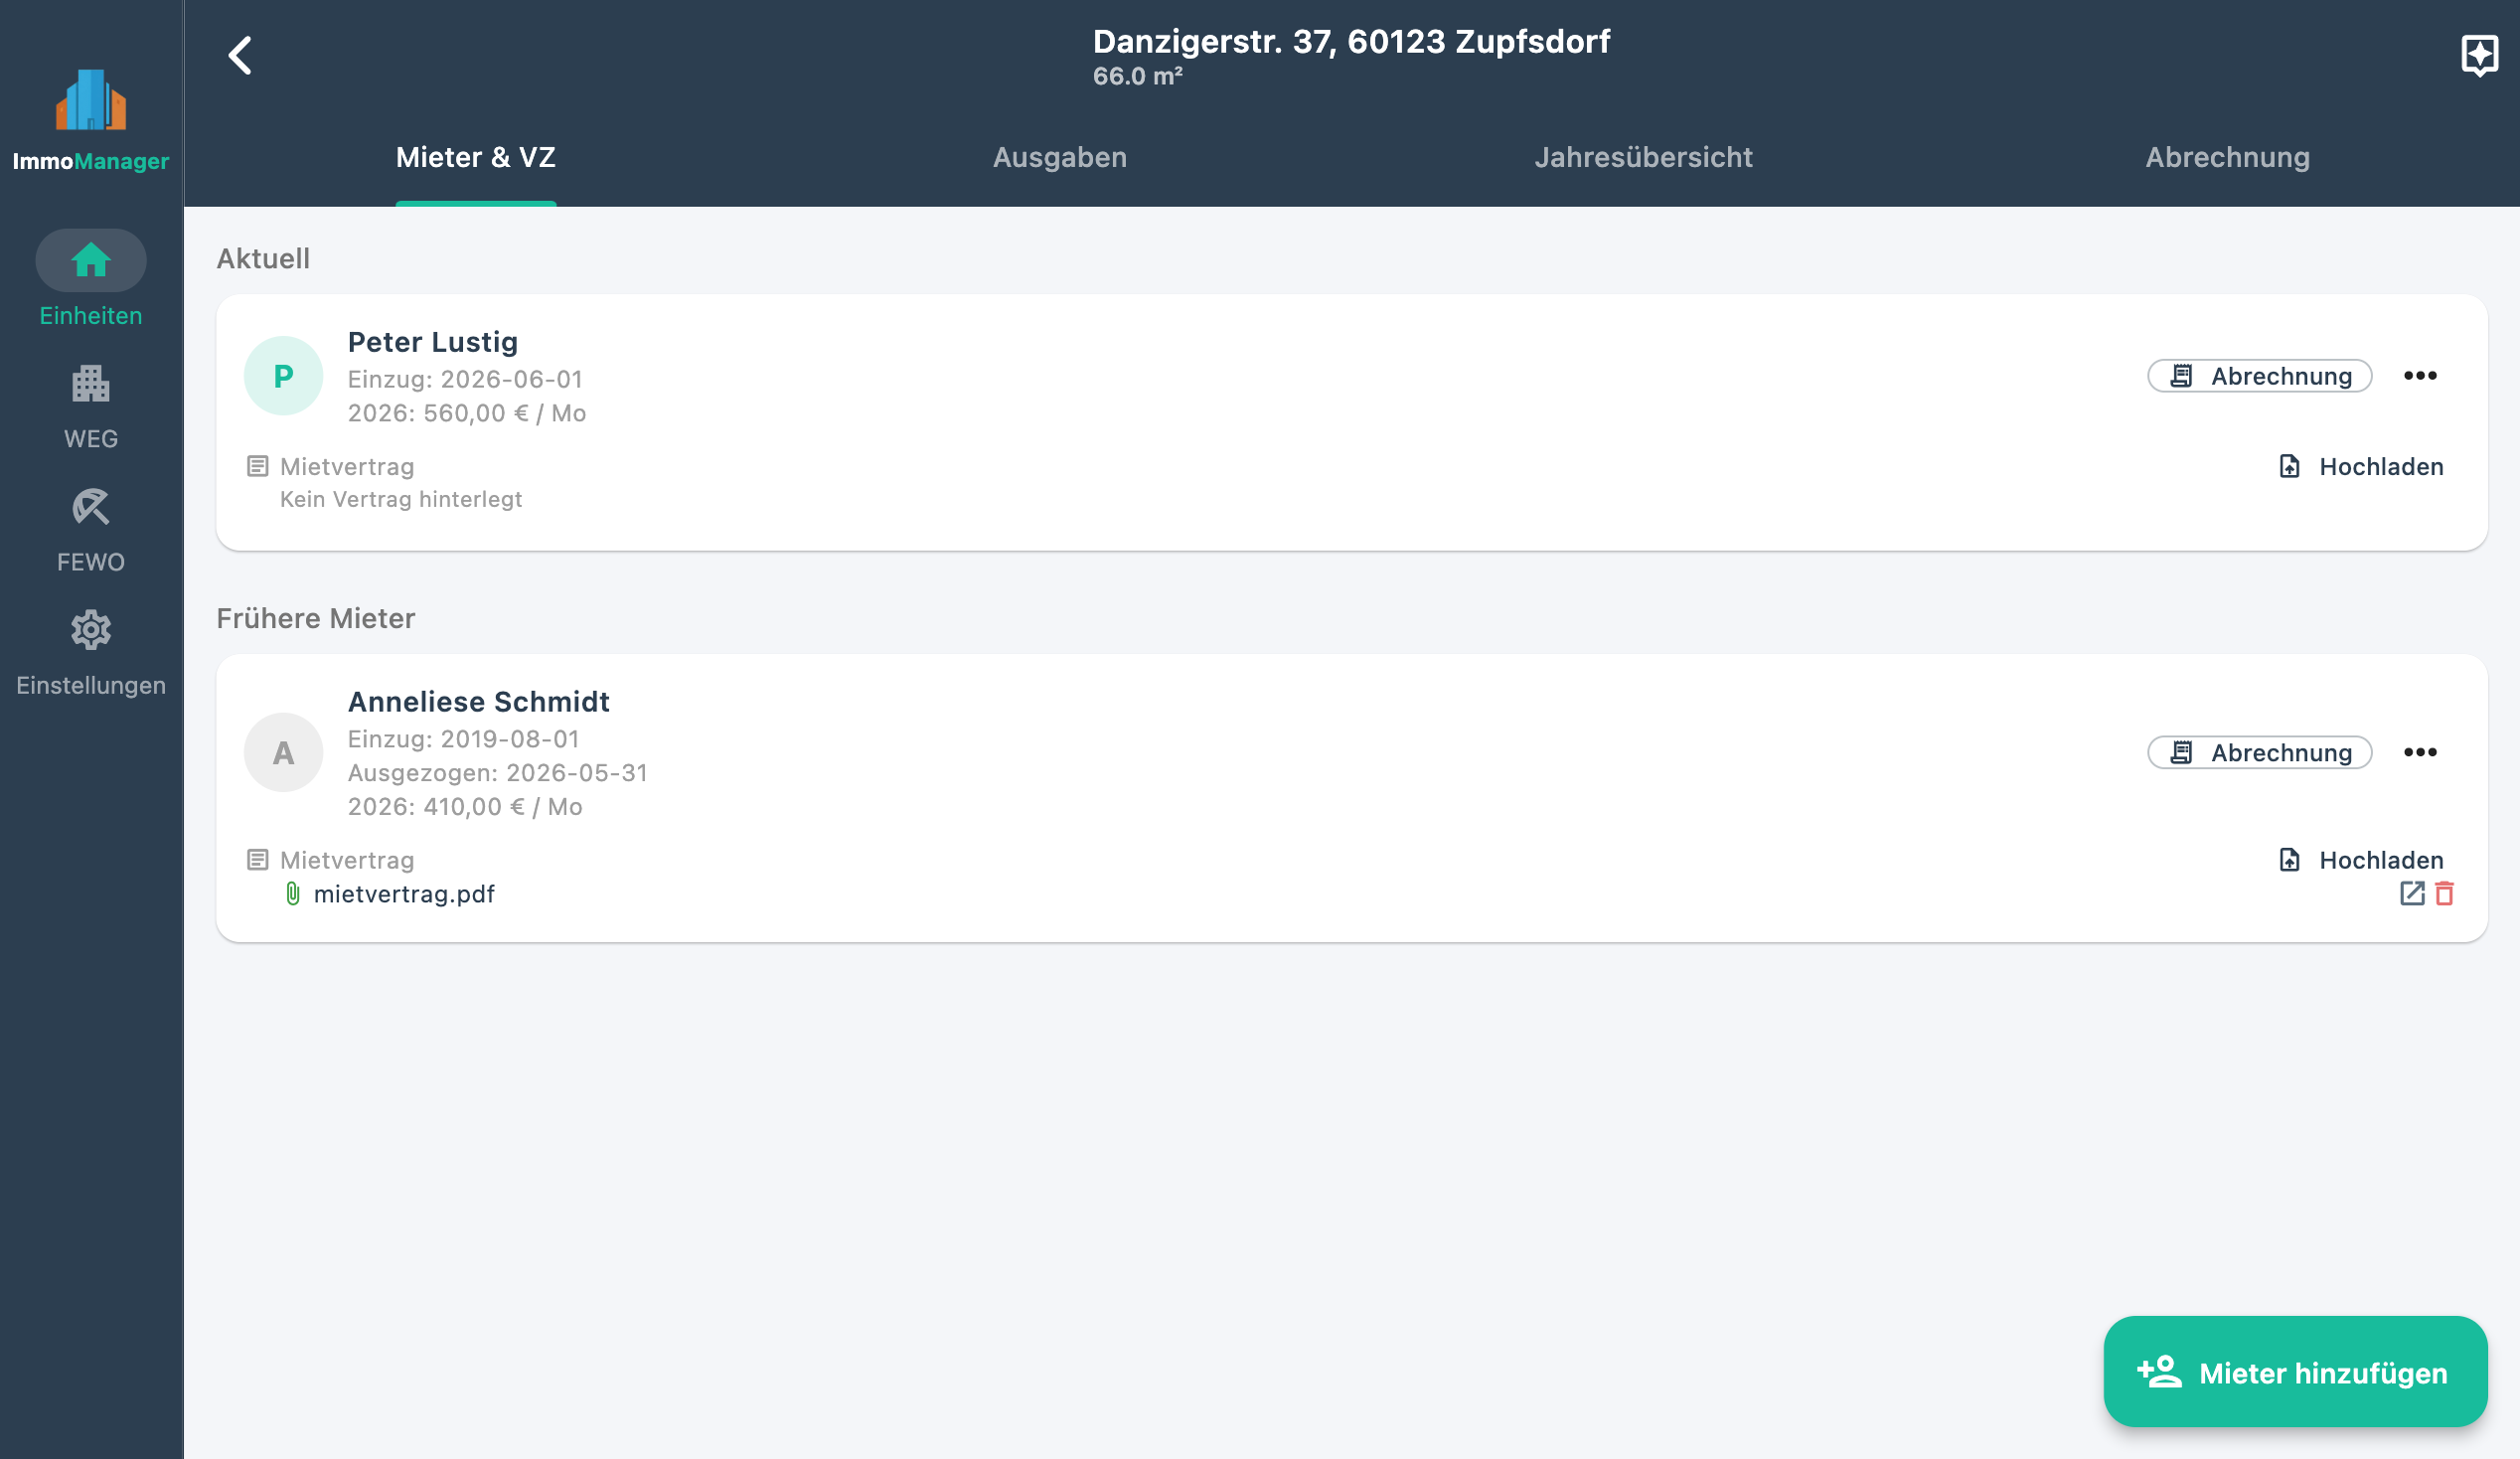
3.2 Manage Tenants
Click "Tenant & Advances" on the property card to open tenant management. On the left you see the current tenant, on the right an overview of all advance payment years with links to the respective statements.
Archive Tenant (Move-Out)
- Enter the move-out date
- Click "Archive Tenant"
The tenant stays in the system and remains accessible through past statements.
Add New Tenant
After archiving the previous tenant, a form appears for entering the new tenant. Alternatively, use the "Create New Tenant" link in the property view.
Reactivate Tenant
Archived tenants are shown at the bottom of the page. Use the arrow icon to reactivate a tenant (e.g. if accidentally archived).
Delete Tenant
In the danger zone (bottom left), tenants can be permanently deleted. Warning: This also removes all associated advance payment data.
3.3 Manage Advance Payments
The advance payment page (accessible via "Tenant & Advances") shows tenant details on the left and the annual history on the right.
Uniform Mode (Annual Amount)
Enter monthly amounts for base rent, utility advances, and heating advances. The annual amount is calculated automatically (amount × 12 months, or proportionally for partial-year months).
Monthly Mode
Click "Monthly" to open a 12-row table. There you can enter individual amounts for each month for base rent, utilities, and heating – useful for rent increases or irregular payments.
Tip: You can switch between modes at any time. When saving, the currently active mode is always used.
3.4 Record Expenses
The expense management opens via "Expenses" on the property card or from within the property view.

Manual Entry
| Field | Required | Note |
|---|---|---|
| Description | ✓ | E.g. "Caretaker service", "Insurance" |
| Amount (€) | ✓ | Gross amount of the expense |
| Year | ✓ | Which billing year this expense applies to |
| Chargeable to tenant | – | Enabled: included in utility bill; disabled: tax purposes only |
| Maintenance reserve | – | Only visible for non-chargeable costs. Marks the expense as a reserve contribution (shown separately in the tax overview, not treated as deductible expense) |
| Distribution on tenant change | – | Only for chargeable costs. Choose "proportional by tenancy days" (default) or "in full" |
Edit Expense
Tap or click the pencil icon (⋮ menu) next to an expense in the table to change description, amount, year, type, distribution rule, and depreciation data.
Copy & Delete Multiple Expenses
Long-press an expense in the list to activate selection mode. Then tap or click additional entries to select them. Action buttons appear at the bottom of the view:
- Copy – choose the target year in the dialog (+ / − buttons) and confirm. All selected expenses are duplicated into the chosen year. Useful for annually recurring costs.
- Delete – after confirmation in the warning dialog, all selected expenses are permanently removed.
The tri-state checkbox on the far left of the action bar selects all visible expenses at once (or clears the selection). The number of selected entries is shown in the action bar.
Depreciation
When recording or editing an expense, there is a collapsible "Depreciation" section at the bottom of the form. If the expense is a depreciable asset (e.g. furniture, fittings, technical equipment), you can optionally fill in:
- Depreciation note – free description of the depreciation rule (e.g. "13 years per depreciation table § 7 EStG")
- Years – useful life in years per the depreciation table
These fields are purely informational and do not affect the utility bill or tax overview in ImmoManager — they serve as a reminder for your tax return. If an analyzed receipt contains depreciation information, the AI receipt analysis automatically populates and expands this section.
Tax note: Acquisition costs for depreciable assets above the low-value asset threshold (currently €800 net) may not be immediately and fully deducted as expenses in rental income schedules. The annual depreciation rate is calculated from the acquisition cost ÷ useful life (§ 7 EStG). Consult a tax adviser when in doubt.
Attach Receipt
When recording manually, you can upload a receipt (PDF or photo) and then click the "AI" button to automatically populate description, amount, and depreciation data (see Section 3.7). The receipt is then linked to the expense and accessible via the paperclip icon in the table.
3.5 Heating Costs & CO2 Levy
How Heating Costs Arise in Practice
In practice there are two common scenarios that differ fundamentally:
Scenario A – Central heating with a metering service provider (e.g. Techem, Ista, Brunata)
The building has a shared heating system. A metering service provider records the heat consumption of each apartment separately via heat cost allocators or heat meters, and produces an annual statement per apartment. This statement already contains the legally required split between consumption-based share (50–70%) and area-based share (30–50%) in accordance with the Heating Costs Regulation (HeizkostenV). You enter the final amount shown on the metering service provider's statement as a chargeable expense in ImmoManager — the HeizkostenV allocation has already been done by the metering company.
Scenario B – Individual apartment heating (own boiler per unit)
Each apartment has its own heating system (e.g. gas boiler). The tenant contracts directly with the energy supplier and pays them — the landlord is not involved. No chargeable heating expenses arise in ImmoManager. The "Heating Advances" field in the advance payments is left empty in this case.
Note on HeizkostenV: Landlords who want to allocate central heating costs to multiple tenants on a flat-rate area basis without using a metering service provider would violate the Heating Costs Regulation. Without unit-specific consumption measurement, direct allocation to individual tenants is not permitted. In this case, engaging a metering service provider is required.
CO2 Levy (CO2KAG)
Since 1 January 2023, the Carbon Dioxide Cost Allocation Act (CO2KAG) requires that the CO2 levy on fossil heating energy (natural gas, heating oil, district heating) is no longer borne entirely by the tenant. The landlord's share depends on the building's energy efficiency class:
| Energy Efficiency Class | Tenant's Share | Landlord's Share |
|---|---|---|
| A+ to B | 0% | 100% |
| C | 10% | 90% |
| D | 20% | 80% |
| E | 30% | 70% |
| F | 45% | 55% |
| G | 60% | 40% |
| H (worst class) | 65% | 35% |
With central heating and metering service: The metering service provider already shows the CO2 cost allocation in its annual statement per unit. The landlord's share appears there as a credit for the tenant and reduces the heating amount payable by the tenant. Enter the net amount shown by the metering service provider after deducting the landlord credit as a chargeable expense in ImmoManager.
With individual apartment heating: The tenant pays their own gas bill — but the landlord must reimburse the tenant for their share of the CO2 levy. Determine the CO2 levy portion from the tenant's gas bill and transfer the landlord's share. This reimbursement is to be recorded in ImmoManager as a non-chargeable expense.
Tip: Your building's energy efficiency class can be found on the energy performance certificate. If no certificate is available, the catch-all rule applies the worst class H, meaning the landlord's share is 35%.
3.6 Lease Analysis
ImmoManager can analyze your lease agreement as a PDF and extract the provisions on ancillary costs and chargeability. The result is permanently available to the AI assistant.
Upload Lease Agreement
- Open the tenant management for the property ("Tenant & Advances")
- Click "Analyze Lease Agreement"
- Upload the lease agreement as a PDF via drag & drop or file selection
- The AI analyzes the document (10–60 seconds depending on page count)
Review and Save Result
After analysis, ImmoManager shows a structured overview of the identified clauses:
- Chargeable costs – cost types that may be passed on to the tenant per the contract
- Excluded costs – explicitly excluded items
- Special agreements – individual provisions that deviate from the standard
Click "Save" to store the analysis result. It is linked to the tenant and can be accessed or overwritten at any time.
Note: The lease analysis is not a substitute for legal advice. The result serves as a reminder and guide, not as a legally binding opinion. Always verify important assessments against the original contract.
3.7 AI Receipt Analysis
ImmoManager can automatically read receipts using AI. Supported formats: PDF, JPG, PNG.
Upload & Analyze Receipt
- Drag the receipt via drag & drop into the upload field, or click "Select File". On mobile devices, the system file picker opens.
- Click the "AI" button to start the analysis (status message: "Analyzing…").
- A review modal opens with the result.
Review Modal
The modal shows a table with the identified line items. Every row is fully editable:
- Description – can be freely adjusted
- Amount – taken from the receipt, can be corrected
- Year – recognized or currently selected year
- Type – chargeable, reserve, or non-chargeable
- Distribution – for chargeable costs: proportional or in full
- Depreciation data – for purchases, the AI automatically recognizes the useful life and depreciation note
Use "Add Row" to manually add further items. Rows can be removed individually via the trash icon.
Click "Save All" to accept all items. The modal closes and the expenses appear in the table.
Retry on Errors
If the AI returns no usable result, an error message appears with a "Try Again" button. The file is not re-uploaded – the initial upload is reused.
Set Up AI (Settings)
Under Settings, choose a provider and enter your API key:
| Provider | Model | Notes |
|---|---|---|
| OpenAI | GPT-4o | Recommended, very reliable |
| Anthropic | Claude Haiku | Most cost-effective option |
| Mistral | Pixtral | EU server location (France) |
| Google Gemini | Gemini | Reads PDFs natively; free starter quota |
Cost note: All providers work on a pay-per-use basis. A receipt analysis typically costs under €0.02. For purely textual PDFs (digitally generated, not scanned), ImmoManager pre-extracts the text — this significantly reduces AI costs.
3.8 AI Assistant
ImmoManager includes an integrated AI assistant that answers questions about your properties, tenancy law, utility billing, and app usage. The assistant opens via the chat icon in the navigation bar of a property.
How It Works
The assistant automatically classifies your question:
- Technical questions (app usage, features, where to find something) are answered directly.
- Specialist questions (tenancy law, ancillary costs, billing) are answered with access to your property data. The assistant proactively asks which data it needs to answer (e.g. expense list for a specific year, tenant data).
Data Access
Upon request by the assistant (or at the start of the chat), ImmoManager makes the following data available:
| Dataset | Description |
|---|---|
expenses_YYYY | Expense list of the property for a specific year |
tenant_info | Tenant data, move-in date, advance payments |
prepayments_YYYY | Advance payment amounts for a year |
weg_units | HOA units with area, ownership share, owner |
weg_expenses_YYYY | HOA expenses for a year |
The assistant only requests data that is actually needed to answer the question.
Lease Context
If you have previously run a lease analysis (see Section 3.6), the assistant takes the extracted contract clauses into account when answering specialist questions. Questions about chargeability are then answered based on the actual contract, not just general tenancy law.
Prerequisite: An AI provider must be configured in settings for the AI assistant to work. Without a configured provider, the assistant shows a notice with a link to settings.
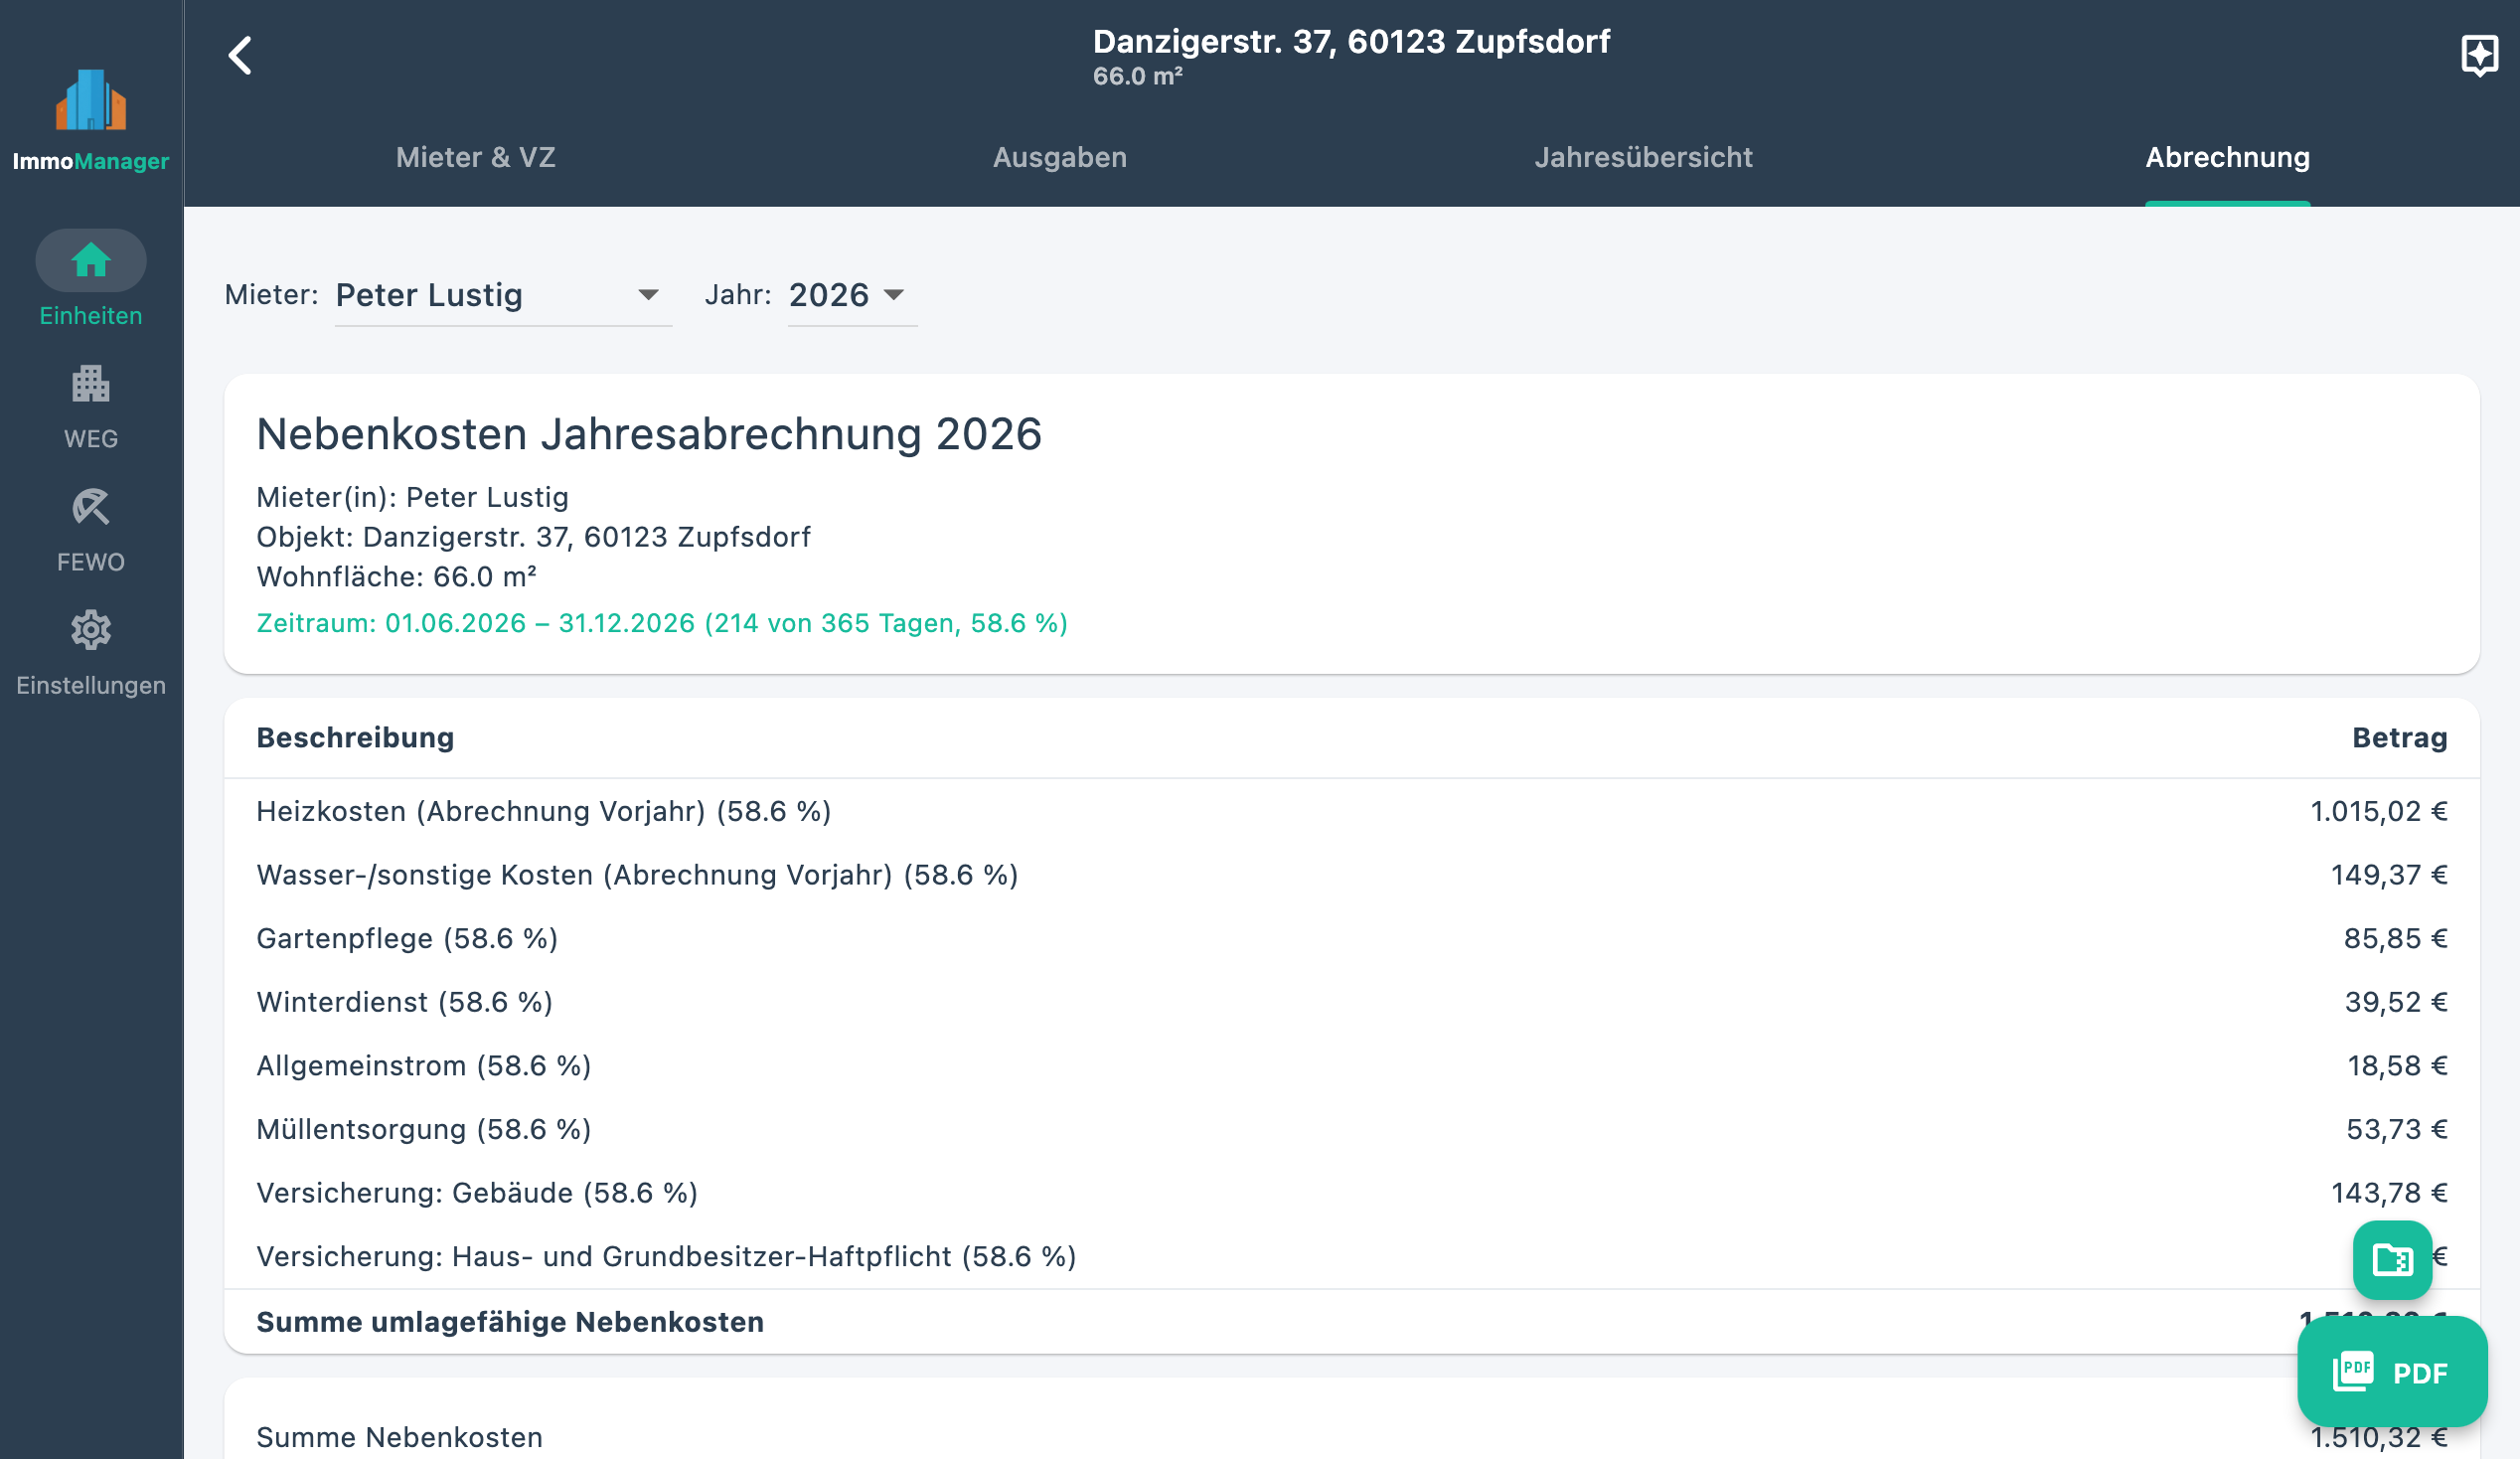
3.9 Utility Billing
The statement is accessed via "Statement" on the property card. You can choose between all years for which expenses have been recorded using the filter at the top.

Statutory billing deadline (§ 556(3) BGB): The utility statement must reach the tenant no later than 12 months after the end of the billing period. For a calendar-year billing period (1 Jan – 31 Dec), the deadline is 31 December of the following year. After this deadline, the landlord loses the right to back-claims — even if the tenant actually underpaid. The tenant's reimbursement claims remain unaffected.
Prerequisites
- At least one tenant with advance payment data in the billing year
- At least one chargeable expense
Chargeable Cost Types (§ 2 BetrKV)
Only costs listed in § 2 of the German Operating Costs Regulation (BetrKV) may be marked as chargeable. Typical chargeable items:
- Property tax
- Water and sewage costs
- Heating costs (central heating via metering service, see Section 3.5)
- Elevator operation
- Street cleaning and waste disposal
- Building cleaning, pest control
- Garden maintenance
- Lighting of common areas
- Chimney sweeping
- Property and liability insurance (building)
- Caretaker (operating costs only, not management costs)
- Shared antenna or cable systems
- Other operating costs (e.g. gutter cleaning)
Non-chargeable items include in particular: management costs, maintenance and repair, vacancy costs, and financing costs. These are recorded as non-chargeable expenses and appear only in the tax overview.
Statement Structure
- Chargeable operating costs – all expenses billed to the tenant.
On a tenant change, costs are automatically calculated proportionally by move-in/move-out days (if the expense is marked accordingly) - Less advance payments – advance payments made by the tenant
- Balance – green = refund to tenant, red = additional payment by tenant
Download Statement as PDF
Click "Download PDF". The file is automatically named by address and tenant and saved to the Downloads folder.
Export Receipts as ZIP
"Download Receipts" creates a ZIP archive with all receipts for chargeable expenses of the selected year. In addition to the ZIP export, tenants have the right to inspect original receipts (§ 259 BGB) — so preserve them carefully.
3.10 Tax Overview
Click "Tax" on the property card to open the tax overview. It serves as the basis for the rental income schedule of your income tax return.
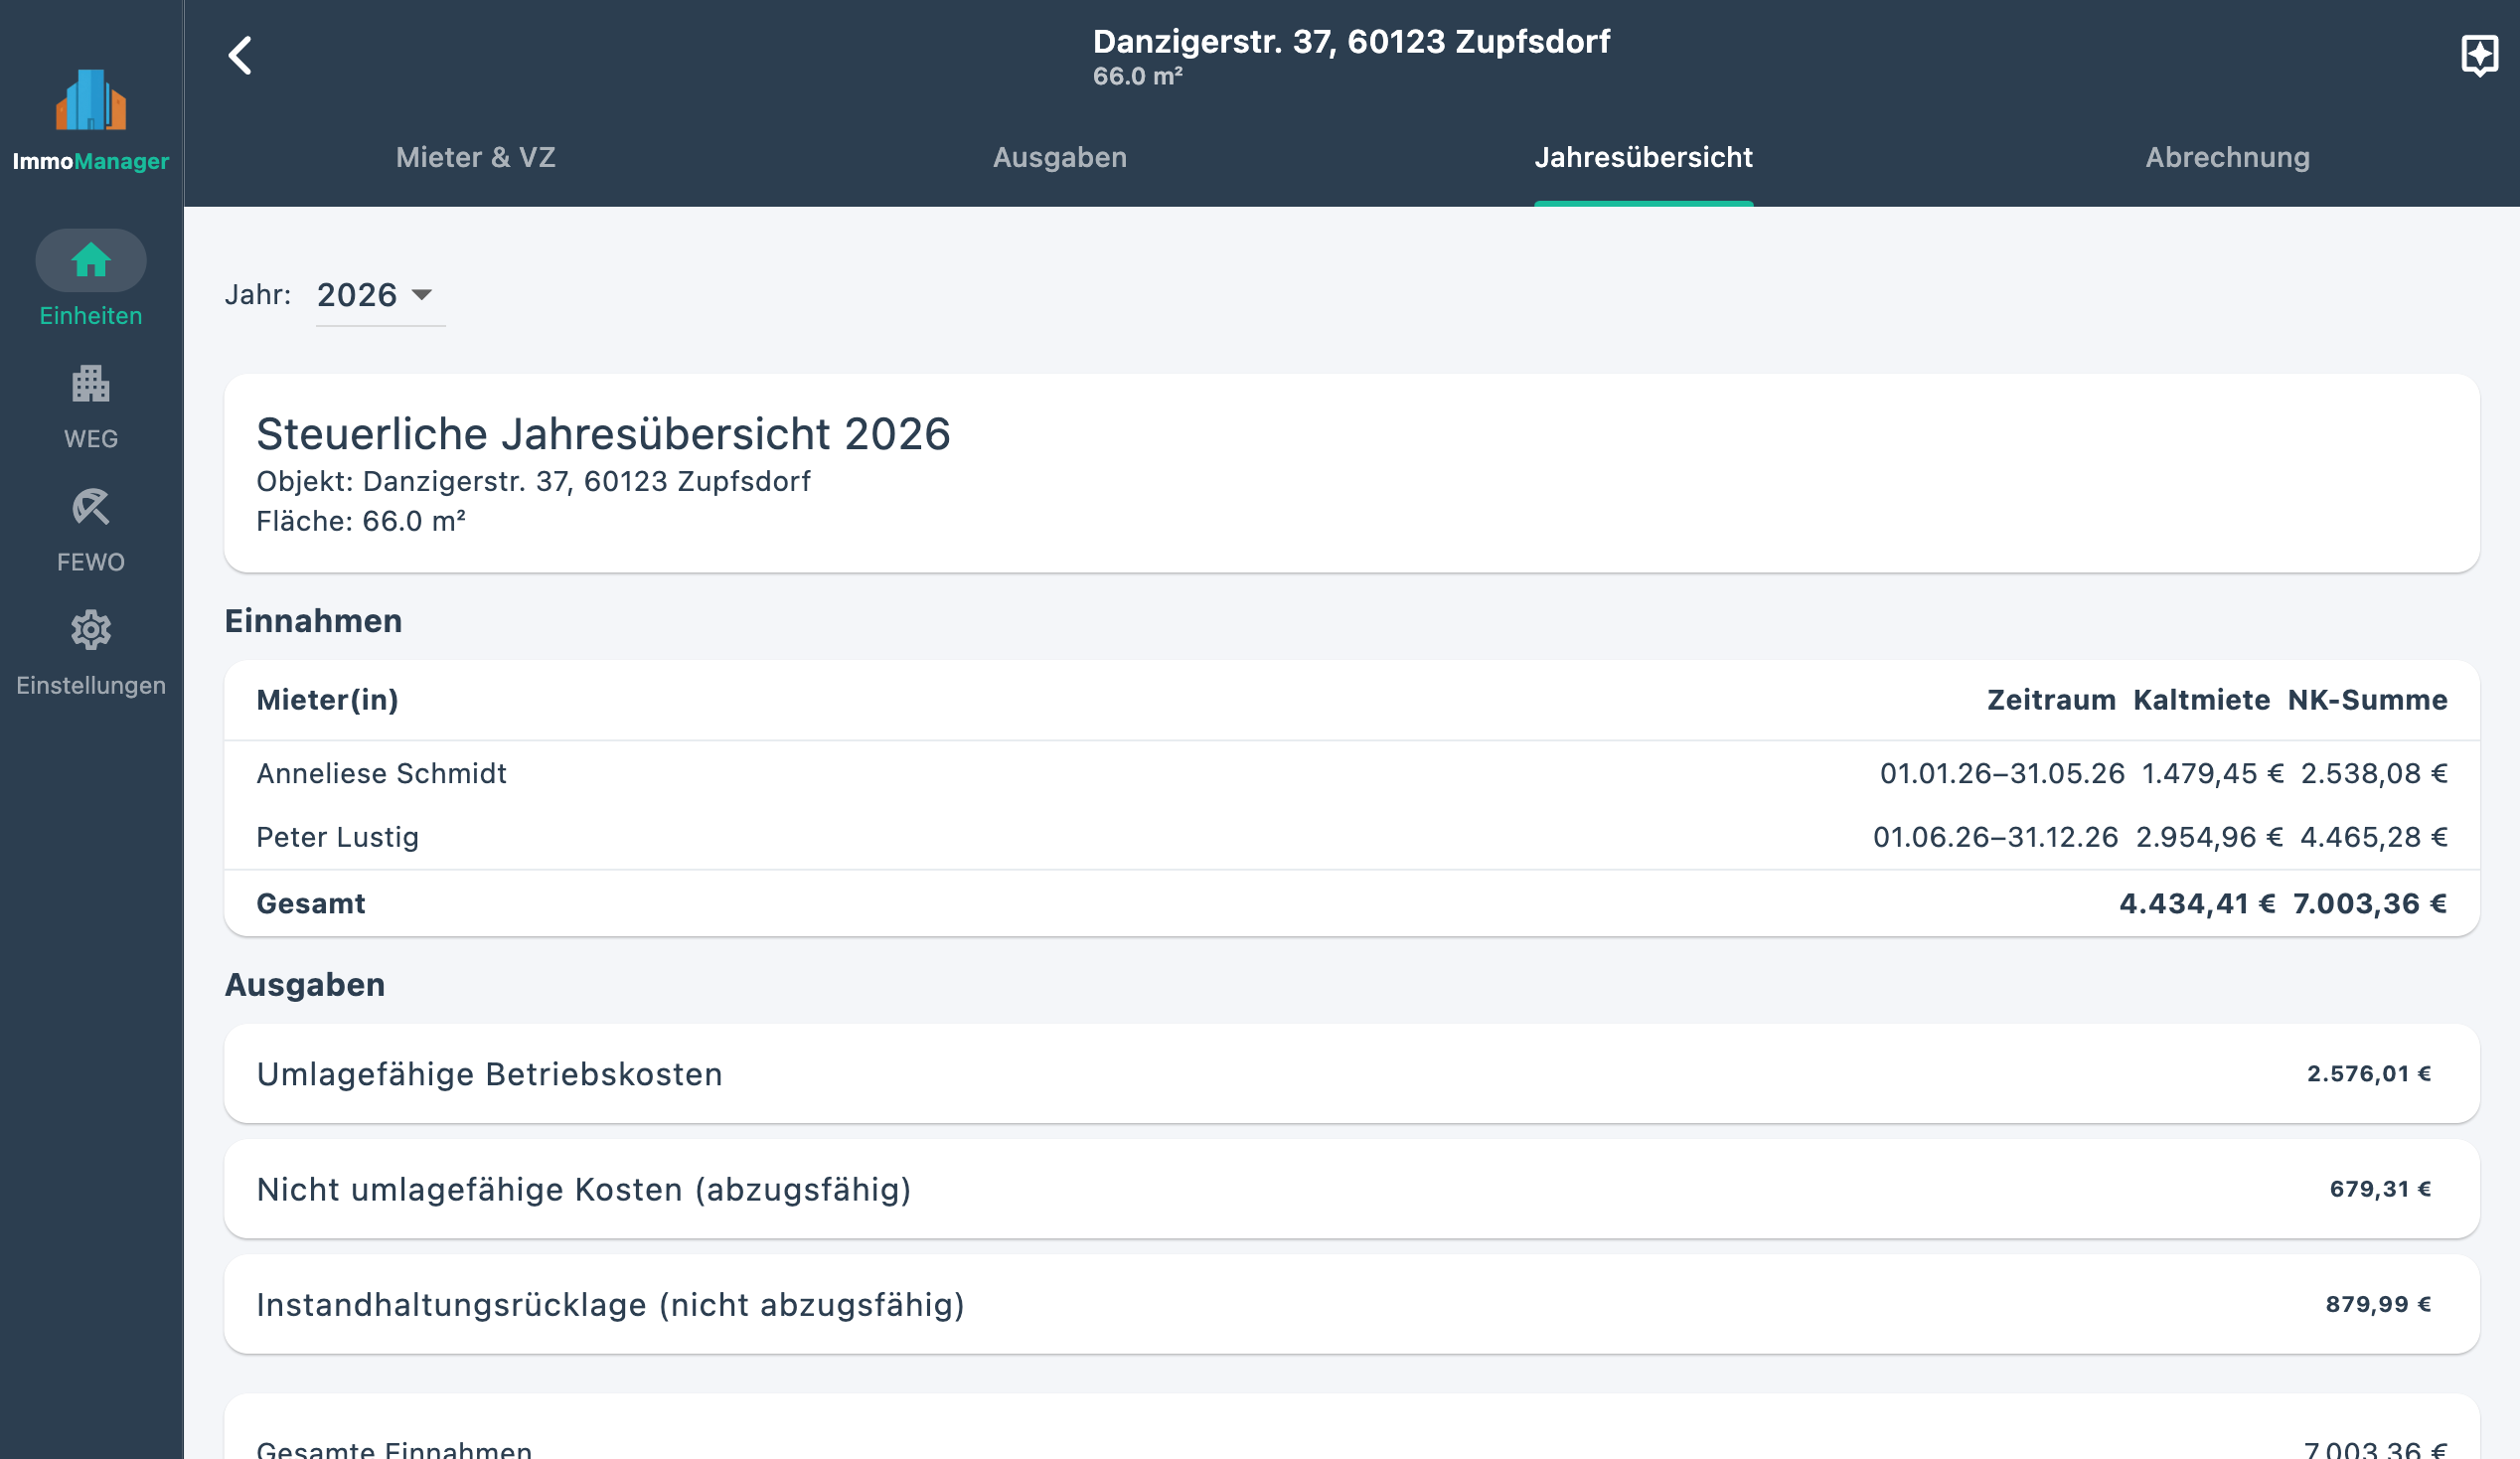
Income
- Base rent per tenant and period
- Utility advance payments
- Utility billing balance (additional payments increase income, refunds reduce it)
Expenses
- Chargeable operating costs – shown as deductible expenses
- Non-chargeable costs – also deductible (e.g. management costs, tax advice)
- Maintenance reserve contributions – shown separately and not deductible (only actual withdrawals count)
Result
The summary shows the taxable surplus or rental loss (excess of deductible expenses).
Note: The tax overview is not a substitute for tax advice. Cross-check the figures with your lease agreement and current tax regulations.
Download PDF & ZIP
Analogous to the utility bill, you can export the tax overview as PDF and all receipts as ZIP.
4. HOA Management
4.1 Create HOA
Click "New HOA" on the dashboard and enter the name (e.g. "HOA Examplestreet 12") and address.
4.2 Declaration of Division Import
The declaration of division (TE) is the founding document of every owners' association. It contains all units with ownership shares, floor areas, and special use rights. Instead of entering each unit manually, you can read in the TE via AI analysis.
Upload Declaration of Division
- Open the HOA Dashboard (via the HOA card on the dashboard)
- Click "Import Declaration of Division"
- Upload the TE as a PDF – via drag & drop or file selection
- The AI analyzes the document and identifies all residential units, parking spaces, and special units with their ownership shares and floor areas
Review and Accept Result
ImmoManager shows a table with all identified units. You can:
- Adjust labels (e.g. "Apartment Ground Floor Left" instead of the TE label)
- Deselect individual units you don't want to import
- Correct ownership share values and floor areas if the AI misread a value
Click "Accept All" to create the selected units as new HOA units. Units already present in the HOA will not be duplicated.
Tip: For extensive declarations of division (50+ pages) with many units, analysis can take 30–90 seconds. The device should not go to standby during analysis.
4.3 Manage Units
In the HOA Dashboard (accessible via the HOA card on the dashboard) you see all units as cards and can add new units via "Add Unit".
Create / Edit Unit
| Field | Note |
|---|---|
| Label | E.g. "Apartment 1st Floor Left", "Ground Floor Right" |
| Owner | Display name of the current owner |
| Living area (m²) | For area-based cost allocation |
| Occupants | Number of occupants (for occupant-count-based allocation) |
| Ownership share (%) | Share in the co-ownership in percent |
HOA Fee & Reserve
When creating a unit, you define the HOA fee and reserve contribution amounts once. There are three calculation modes:
| Mode | Calculation |
|---|---|
| Fixed amount | Directly entered €amount per month |
| Area × rate | Living area × entered rate (€/m²/month) |
| Ownership share × total | Ownership share × HOA total per month |
The result is shown in real time as "Monthly: HOA fee X € + Reserve Y € = Z €". When saving, ImmoManager automatically creates an annual HOA fee entry for the current year with the calculated annual target amounts. You then record the actual amounts paid in the Reserve Fund.
Unit Tenant
One active tenant can be recorded per unit (e.g. if the HOA apartment is rented out). The function is identical to tenant management for individual properties.
4.4 Owner History & Change of Ownership
In the editing form of a unit (right column), there is an "Owner History" section. This is relevant when a unit is sold during the year and costs need to be split between seller and buyer.
Enter Ownership Period
- Enter name, owned from (purchase date) and optionally owned until (sale date)
- Click "Add Owner"
- Repeat for each owner of the unit
No end date means "currently still owner".
Archive Owner (Sale)
Next to an active owner without an end date, a date field appears. Enter the sale date and click the archive icon. The entry moves to the collapsed "Previous Owners" section.
How Does Owner History Affect the Statement?
If multiple owners are recorded for a unit in the same billing year, ImmoManager calculates each owner's share of the costs by number of ownership days.
Example: Unit was sold on 1 July → seller bears 181/365 = 49.6% of annual costs, buyer 50.4%.
Individual expenses can additionally be directly assigned to an owner (e.g. a repair that is exclusively the seller's cost). This expense then goes 100% to the assigned owner, regardless of day count.
4.5 Record HOA Expenses
Click "Record Expenses" in the HOA Dashboard to open HOA expense management. You can filter by year at the top.

Manual Entry
| Field | Note |
|---|---|
| Description | E.g. "Caretaker October", "Insurance 2024" |
| Amount (€) | Total amount for the HOA |
| Year | Billing year |
| Area & distribution | How costs are distributed across units (see below) |
| Chargeable | Enabled: included in HOA statement |
| Paid from reserve | Only for non-chargeable costs. Marks expenses paid from the reserve fund account |
Distribution Key
| Option | Effect |
|---|---|
| HOA-wide – Equal split | Costs split equally across all units |
| HOA-wide – By living area | Share proportional to each unit's living area |
| HOA-wide – By occupant count | Share proportional to number of occupants |
| HOA-wide – By ownership share | Share corresponds to the ownership percentage (most common key) |
| Only: [Unit] | Costs assigned exclusively to this unit |
Assign Directly to Owner
If you choose "Only: [Unit]" as area and ownership periods have been recorded for this unit, an additional dropdown "Assign to Owner" appears:
- All owners (split by days) – default; allocation by ownership days
- [Name] (date – date) – 100% of this expense goes to the selected owner
Copy & Delete Multiple Expenses
Long-press an expense in the list to activate selection mode. Tap or click additional entries to select them. In the action bar at the bottom:
- Copy – choose target year; all selected expenses are duplicated there
- Delete – with confirmation dialog
Depreciation
When recording or editing a HOA expense, there is a collapsible "Depreciation" section at the bottom of the form – analogous to rental properties. Enter the depreciation note and useful life for depreciable assets. The AI populates these fields automatically for recognizable purchases.
AI Extraction
Just like with rental properties, receipts can be uploaded via drag & drop and automatically read via the "AI" button. The review modal here additionally includes a "Area & Distribution" column for each identified item, so you can set the distribution key during review.
4.6 Reserve Fund Account
Manage the reserve fund account via "Reserve Fund" in the HOA Dashboard.

Year Filter
Select the display year at the top. All sections below refer to the selected year.
Opening Balance
Enter the account balance as of 1 January of the year in the bottom left and save. For the first year, this corresponds to the actual balance in the reserve fund bank account.
Tip: The previous year's closing balance is not transferred automatically – enter it as the opening balance for the new year manually.
Read Interest Certificate via AI
- Upload your bank's interest certificate via drag & drop into the upload field
- The AI automatically identifies three items:
- Interest income (positive amount)
- Withholding tax (negative amount)
- Solidarity surcharge (negative amount)
- The review modal shows a table with all three items – all fields are editable
- Individual rows can be deleted (e.g. if no solidarity surcharge applied)
- "Save All" transfers the entries to the reserve fund account
Record Income Manually
Using the form on the left you can enter income manually:
- Interest income – interest earned from the savings account
- Other income – e.g. refunds, miscellaneous credits
In the income table (top right), all entries appear with a type badge: Interest (green), Withholding tax (red), Solidarity surcharge (yellow), Other (grey).
Owner Contributions
The "Owner Contributions" table shows for each unit:
- Target/Year – the calculated annual contribution due (monthly rate × 12) per unit settings
- Paid – an editable input field for the amount actually received
- Difference – green for overpayment, red for underpayment
After entering amounts, click "Save Contributions".
Withdrawals
Expenses marked as "Paid from reserve" in the HOA expense management automatically appear in the withdrawals table here. No manual entry is required.
Account Development
Opening balance 1 Jan YYYY
+ Net interest income (after taxes)
+ Reserve contributions received (actual)
− Withdrawals
= Closing balance 31 Dec YYYY
If the actual contributions received differ from the target amount, a note with the target amount appears under "Reserve contributions received".
4.7 HOA Annual Statement
In the HOA Dashboard, for each unit and each year with expenses, there is a button "Statement YYYY". This opens the annual statement preview.
Complete the Data
Before first printing, two input cards should be filled in:
Card 1 – Actual amounts paid:
Enter how much HOA fee and how much reserve the owner actually paid during the year. If no discrepancies exist, the target amounts are pre-filled.
Card 2 – Reserve fund account:
Opening balance and interest for the HOA-wide account development. These values are taken from the reserve fund account if already maintained there.
Statement Structure
- Chargeable costs – all HOA-wide and unit-specific expenses that can be charged to owners
- Non-chargeable costs – costs that cannot be charged to owners but are borne by the owner
- Withdrawals from reserve – expenses paid directly from the reserve fund (do not increase the balance)
Balance (additional payment / refund):
Chargeable costs
+ Non-chargeable costs
− HOA fee paid
− Reserve paid
= Balance (red = additional payment, green = refund)
Reserve Fund Account Development
Shows the HOA-wide account development for the selected year. Below that, the separate table "This unit's share of the reserve fund":
| Item | Value |
|---|---|
| Total account 31 Dec | HOA closing balance |
| This unit's ownership share | Share in co-ownership in % |
| Calculated share | Share of the total account (relevant for sale) |
This amount is value-determining in a sale of the unit. It is not paid out but is economically transferred to the buyer.
Owner Allocation (only for change of ownership)
If multiple owners are recorded for this unit in the billing year, this section appears automatically:
| Owner | Period | Days | Share | Costs |
|---|---|---|---|---|
| John Smith | 01 Jan – 30 Jun | 181 | 49.6% | €1,240.00 |
| Jane Doe | 01 Jul – 31 Dec | 184 | 50.4% | €1,260.00 |
Download Statement as PDF
Click "Download PDF". The statement is saved as a print-ready file.
5. Holiday Apartments
ImmoManager manages holiday apartments as a standalone property type, separate from regular rental properties and HOAs. Holiday apartments appear on the dashboard in their own section and are created via "New Holiday Apartment".
5.1 Create Holiday Apartment
When creating, enter name, address, and living area (m²). Via the three-dot menu (⋮) of a holiday apartment card, you can edit, archive, or delete the holiday apartment.
5.2 Record Expenses
Open the holiday apartment detail view and switch to the "Expenses" tab. Click "Add Expense" to open the input form. Holiday apartment expenses have a category and a date in addition to description and amount:
| Category | Tax significance |
|---|---|
| Operating costs | Ongoing running costs (electricity, water, internet, waste...) |
| Financing costs | Interest and repayment portions on loans |
| Purchase | Buying furniture, appliances, etc. (may be depreciable) |
| Repair | Maintenance costs (immediate deduction, no depreciation) |
| Management | Management costs (tax adviser, bookkeeping, listing fees...) |
| Other | All other expenses |
Depreciation
At the bottom of the form is the collapsible "Depreciation" section. This is particularly relevant for purchases that need to be depreciated over several years (e.g. furniture, TVs, kitchen appliances per depreciation table). Enter the depreciation note and useful life in years. The AI receipt analysis automatically populates this section for recognizable purchases.
Note: Repairs are immediately deductible and do not require depreciation. The depreciation section is technically available for all categories, but is only tax-relevant for purchases.
Receipt & AI Analysis
Upload a receipt via drag & drop or file selection. Then click the "AI" button to automatically populate description, amount, date, category, and depreciation data. Missing receipts can be flagged with the "Receipt missing" marker.
Edit Expense
Tap or click the pencil icon (⋮ menu) in the expense list to subsequently change all fields including depreciation data.
Copy & Delete Multiple Expenses
Long-press an expense to activate selection mode. Tap or click additional entries. In the action bar at the bottom:
- Copy – choose target year; copied holiday apartment expenses receive 01 Jan of the target year as date
- Delete – with confirmation dialog
5.3 Income Statements
In the "Statements" tab of the holiday apartment detail view, you record the income from holiday rentals. Each statement contains date, description, income, and payout amount (e.g. with platform commission deducted). The AI can also read receipts here automatically (e.g. Airbnb statement PDFs).
Tax note: Special rules on hobby loss (total surplus forecast) apply to holiday apartments. If there is partial private use, expenses are only partially deductible. Seek tax advice.
6. Archive & Delete Properties and HOAs
Archive
Archived properties and HOAs are no longer visible on the dashboard but remain fully intact. Statements, expenses, and tenant data are still accessible.
To archive: three-dot menu → "Archive".
To reactivate: click the arrow icon in the "Archived" section on the dashboard.
Delete Permanently
Warning: Deletion is irreversible. All associated data is removed:
- For rental properties: tenants, advance payments, expenses, receipts
- For HOAs: all units, expenses, reserve fund entries, receipts
To delete: three-dot menu → "Delete Permanently" → confirm in the dialog.
7. Settings
Accessible via the gear icon or the link in the navigation area.
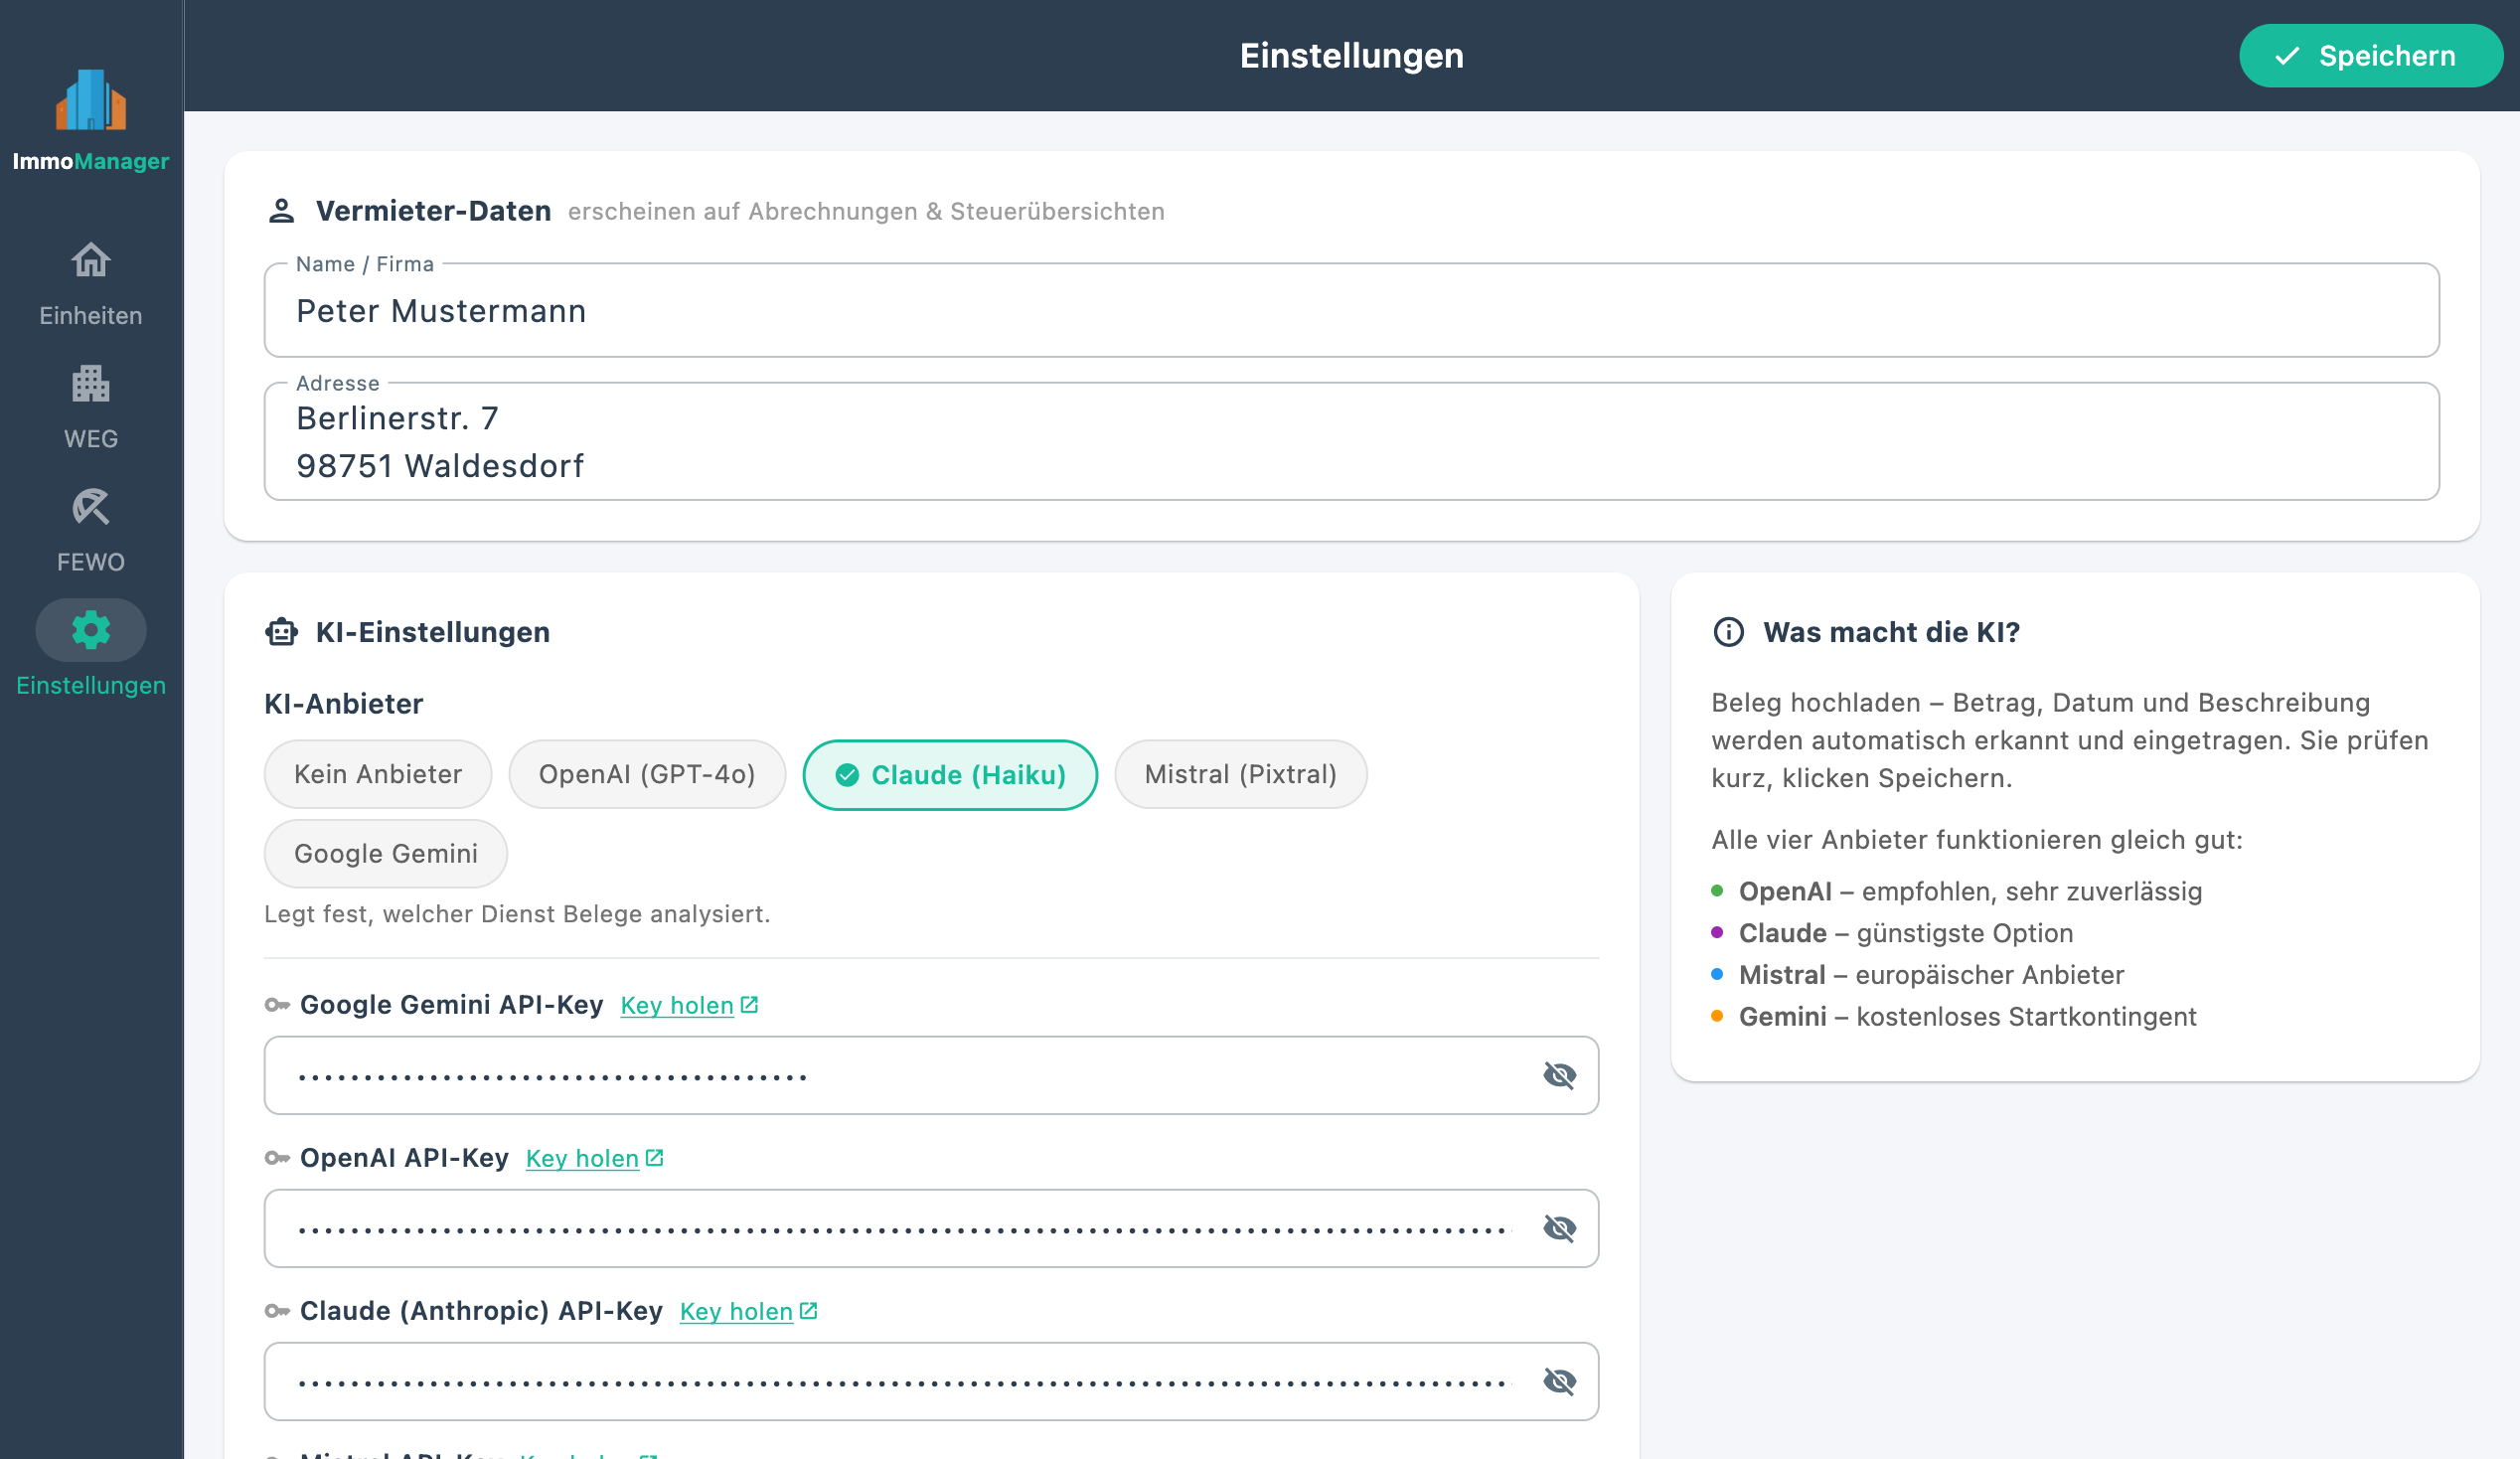
Landlord Details
- Name – appears as sender on billing PDFs
- Address – also on all documents
AI Settings
Choose one of the four providers and enter your API key. The key is stored encrypted in the local database. If you don't want to use AI features (for now), choose "No provider" – ImmoManager then runs completely offline.
Note: If a provider is selected but no API key has been entered, ImmoManager shows a warning with a link to settings when you try to use the AI.
You obtain the API key after free registration with the respective provider:
- OpenAI: platform.openai.com/api-keys
- Anthropic (Claude): console.anthropic.com/settings/keys
- Mistral: console.mistral.ai/api-keys
- Google Gemini: aistudio.google.com/apikey
You can switch provider at any time – all providers use the same workflow.
User Manual
The "User Manual" button (book icon) at the bottom of the settings page opens the complete user manual directly in the app – without an internet connection. The text shown corresponds to the documentation included in the app package.
Reset Database
In the danger zone of the settings page, you can reset the entire database. All data will be irreversibly deleted. Only use this function if you want a complete fresh start.
8. Data Backup
All data is stored locally on your device. On macOS, it is split across two subfolders within the app container:
| Contents | Path (macOS) |
|---|---|
| Database | ~/Library/Containers/de.entropy-zero.immoManager/Data/Documents/immo_manager.sqlite |
| Receipts & contracts | ~/Library/Containers/de.entropy-zero.immoManager/Data/Library/Application Support/de.entropy-zero.immoManager/ |
The easiest way to find the database:
find ~ -name immo_manager.sqlite 2>/dev/nullThe receipt subfolders within Application Support/de.entropy-zero.immoManager/:
unit_expense_docs/– receipts for rental property expensesfewo_docs/– receipts for holiday apartment expensesweg_docs/– receipts for HOA expenses and declarations of divisioncontracts/– uploaded lease agreement documents
On Windows, the database is located at %USERPROFILE%\Documents\immo_manager.sqlite and receipts at %APPDATA%\de.entropy-zero.immoManager\.
On iOS / Android, data is backed up in the system-managed app container (iOS: iCloud Backup; Android: Google Backup).
Create Backup (macOS)
For a complete backup, copy the entire container folder:
cp -R ~/Library/Containers/de.entropy-zero.immoManager ~/Desktop/ImmoManager-Backup-$(date +%Y%m%d)Alternatively: Time Machine automatically backs up the container as long as the ~/Library/ folder is not excluded. For a device change, copy the entire container to the new Mac and restore it to the same path.
Important: Always back up both the database and the Application Support folder with the receipts. The database alone is not sufficient, as receipts are stored separately.
9. Frequently Asked Questions
How many properties and HOAs can I create?
Unlimited. There is no restriction on the number of properties, HOAs, units, or tenants.
What happens with a mid-year tenant change?
ImmoManager calculates costs proportionally by tenancy days. Expenses marked as "proportional by tenancy days" are only billed for the period during which the tenant was residing. Expenses marked as "in full" (e.g. a unit-specific repair) are carried over in full.
Can I create a statement for several past years?
Yes. Using the year filter (at the top of the statement page) you can access any year for which expenses have been recorded.
The AI returns an incorrect result – what should I do?
All fields in the review modal are editable. Correct incorrect values there before clicking "Save All". Alternatively, click "Cancel" and enter the expense manually.
Do I have to use the AI for every receipt?
No. The AI is optional. All expenses can be recorded completely manually. Receipts can also be attached to expenses without AI analysis (upload → save directly in form).
Can I use ImmoManager without an AI provider?
Yes. Choose "No provider" in settings. All core features (record expenses, utility billing, HOA statement, tax overview, PDF export) are fully available. Only the AI-assisted features (receipt analysis, lease analysis, AI assistant, reading interest certificates) require a configured provider.
What does the lease analysis do?
The lease analysis reads your lease agreement as a PDF and extracts all clauses on ancillary costs, chargeability, and special agreements. The result is saved and available to the AI assistant. For questions on chargeability, the assistant then refers to the actual contract text, not just general tenancy law. The analysis is optional – the normal workflow also works without it.
How do I use the AI assistant?
Open a property or HOA and click the chat icon. You can ask questions about app usage, tenancy law, utility costs, and specific figures from your properties. The assistant automatically asks which data it needs. If you have previously run a lease analysis, it uses the contract data for more precise answers.
How does the declaration of division import work?
Click "Import Declaration of Division" in the HOA Dashboard and upload the TE as a PDF. The AI analyzes the document and identifies units, ownership shares, and floor areas. You get a preview table, can adjust labels, and accept all or individual units with one click. Without TE import, units can also be created manually as before.
Is ImmoManager also available for iOS and Android?
Yes. ImmoManager is available for iPad (iOS 16+) on the Apple App Store and for Android (8.0+) on the Google Play Store. The mobile apps offer the same feature set as the desktop versions. Data is stored locally on the device – no login or cloud synchronization required.
What does the "calculated share" of the reserve fund mean?
When selling an HOA unit, the seller has paid reserve contributions into the shared fund over the years. This fund belongs to the HOA and is not paid out – but the buyer "takes it over" economically. The calculated share shows what portion of the total account corresponds to this unit's ownership share, and is thus a value-determining factor in a sale.
Are tenant/owner names stored encrypted?
Yes. Tenant names are stored with Fernet encryption. The key is in the file secret.key – it must not be deleted or replaced.
Can I use the app on multiple devices?
ImmoManager is a local single-device application without cloud synchronization. For switching to another desktop device, copy the complete data folder (including secret.key and uploads/). Simultaneous use on multiple devices with a shared database is not supported. The license key is valid cross-platform for macOS, Windows, iOS, and Android.
What does the AI provider cost per month?
All supported providers work on a pay-per-use basis – you only pay for what you actually process. A receipt analysis typically costs between €0.005 and €0.02, depending on the provider and document size. There is no monthly subscription.
How do I record heating costs when a metering service provider bills?
The metering service provider (e.g. Techem, Ista) creates a per-unit statement at year-end showing the unit-specific heating cost amount per HeizkostenV-compliant allocation. Enter this final amount as a chargeable expense for the billing year. Attach the metering service provider's statement as a receipt. The consumption-based allocation (50–70%) is already handled by the metering company — you don't need to calculate anything yourself.
What applies for the CO2 levy on heating costs?
Since 2023, landlords must bear part of the CO2 levy on fossil heating energy. With central heating and metering service, the landlord's share is already reflected in the metering service statement — the amount the tenant must pay is reduced accordingly. With individual apartment heating (tenant's own gas contract), the landlord must separately reimburse the tenant for their share; determine the CO2 levy from the tenant's gas bill and reimburse the landlord's share according to your building's energy efficiency class (A+/B = 100% landlord, H = 35% landlord). This reimbursement is to be recorded in ImmoManager as a non-chargeable expense.
I have a multi-family building with multiple tenants but no HOA – how do I set this up?
Create a separate property for each apartment. Enter shared building costs (e.g. building insurance, caretaker, property tax for the whole building) proportionally in each property – allocated by the key agreed in the lease (usually living area). Alternatively, you can create the whole building as an HOA even if there is no owners' association in the legal sense – the HOA feature is generally suitable for multi-party buildings since it automatically calculates distribution keys.
By when must the utility statement reach the tenant?
The statement must reach the tenant no later than 12 months after the end of the billing period (§ 556(3) BGB). For a calendar-year billing period (1 Jan – 31 Dec), the deadline is 31 December of the following year. If the statement arrives after this date, the landlord loses the right to back-claims — the tenant's reimbursement claims remain. Plan sufficient time for preparation and postal or personal delivery.
Must I show the tenant the original receipts?
Yes. Tenants have the right under § 259 BGB to inspect original receipts. The ZIP export from ImmoManager is a convenient way to provide copies, but does not replace the obligation to grant inspection of originals upon specific request. Retain all original receipts at least until the tenant's objection period has expired.
How long does the tenant have to contest the statement?
Tenants have 12 months after receiving the statement to raise objections (§ 556(3) sentence 5 BGB). After this period, the tenant's objections are excluded — unless the tenant is not responsible for the late assertion. Retain proof of the delivery date (e.g. registered letter with return receipt or written acknowledgment of receipt).
Is the billing period always the calendar year?
Not necessarily. The billing period is determined by the lease agreement and may be a maximum of 12 months. Many lease agreements use the calendar year (1 Jan – 31 Dec) – ImmoManager is designed for this common case. If your lease provides for a different period (e.g. 1 Oct – 30 Sep), you should assign expenses to the contractually agreed year accordingly.
Does ImmoManager run on my Intel Mac?
The app is built as an ARM binary and only runs natively on Apple Silicon Macs (M1 and newer). On an Intel Mac you can still use ImmoManager by first installing Rosetta 2: open Terminal and run softwareupdate --install-rosetta --agree-to-license. The app then starts via Rosetta without further configuration. For a management application, the performance difference is barely noticeable.
Windows shows a security warning on launch – is that normal?
Yes, this is normal and not a sign of malware. Windows SmartScreen shows the message "Windows protected your PC" for installer files that haven't reached sufficient distribution yet. Click "More info" and then "Run anyway" to proceed with installation. The warning disappears automatically when the app reaches a larger user base.